Monday, August 23, 2010

Halloween Mini Album Winner!


When I was on my way out the door to go on our camping trip this is what was in my mailbox. A Halloween Mini Album made by Rhonda from Scrap Happens.

I was so excited I left Glenn in the truck and ran back in the house to send her an email. I took the album with me to Oooh and Awww over it on the way to the campsite.


My favorite detail about the album is the caution tape on the front, that says "Do Not Enter".


The windows are boarded up.


There is even a large spider crawling into its webb on the rooftop.

This album is so full of details. Her work is amazing! If you would like to see the rest of the book, just simply follow this link, Scrap Happens.

Rhonda offers a free mini album every week to one lucky person who enters an idea for a mini album. She then posts a tutorial for the chosen album later in the week. Because she has had so many enteries for Halloween Mini Albums she has decided to do two a week for a while, one being themed for the Halloween holiday. What a generous offer! 

I am so lucky to be chosen to receive a mini album made by Rhonda. I encourage everyone to give it a try. Just go to Scrap Happens.

Thanks Rhonda!

Until Next Time... Take Care!

Monday, August 16, 2010

Gone Camping


Well, it's that time... time for my camping trip. I have known that I was taking this trip for around 3 weeks now, so you would of thought I would be ready for it right? Wrong! I could not be more unprepared. And here I sit on the computer.

I am really going to miss everybody! So many of you have became my friends. Friends that I look forward to talking with, sharing our daily lives with and sharing what we love... crafts.

Speaking of, I am going to miss my crafts. Well, most of them anyways. I do plan to take all of my mini books, my new Scotch Advanced Tape Glider, my file kit, scissors and patterned paper so that I can get my mini albums covered. This will be a big step in the right direction to get some items in my store for the Christmas Season.


Just know that when I am sitting around the campfire at night I will probably be wondering what everyone out there in blogland is doing and hoping that you all are doing great!

Have a wonderful week and I will see everyone on Sunday.

Until Then... Take Care!

Saturday, August 14, 2010

August Creative Spirit Challenge, Purse Scrapbook


When I heard that Cindy Adkins was having a Creative Spirit Challenge at her blog, Whimsical Musings, I knew exactly what I was going to enter, A Scrapbook Purse, that I have been wanting to start for some time now.

When I went to embellish the front of my purse it was a little bit of a dilemma. I wanted to get crazy and detailed with a bunch of bling, yet I wanted to stay true to myself and my personality. So I got all of my purses out and laid them out on my bed. One thing held true time and time again and that was the black leather handbag. As beautiful as it is alone I still wanted more than that and a little trim, so I went with a cross and another matching jewelry piece.


This coordinating jewelry piece consists of a crown, cross, a few pearls and a leaf. This beautiful hanging embellishment along with the cross signify my love for the king of kings, my lord, Jesus.

To finish it off I put a strip of coordinating crystals that stretch across the purse, toward the bottom. I stood back and knew that this is exactly what I wanted and I still had a lot of bling.


I purchased this purse kit from 7 Gypsies. It came with the hardware for the handles and clasp, but it needed some feet. So, I found these wooden pieces in the wood working craft section. I painted them black and attached them with a wood glue to ensure that they were not going any where. I feel it really added a whole new look to the purse and presentation. I love it!

Well, how about a tour of my scrapbook. There are a total of seven layouts all together. However we will only be seeing four of them and the front page because Glenn is being shy... (eye roll!)
 

So, I guess we should start with the front page. One thing that I loved about doing this book, is although I kept the book cohesive by sticking with the same color palette and paper collection, I played with all kinds of my favorite techniques and embellishments.


One of my favorite techniques these days is to paint grungeboard with crackle paint. This time I rubbed black ink over the top to get in the cracks, stamped on it with a musical background stamp and wiped the ink away so that the ink was light. I then embossed the edge and used distressed embossing powder to grunge it up a little more.


I am not always up to date on what trends are in and out, but I do know what I like and don't like, and I have always been a fan of the over sized letters. Here, I added an S for Sherry. I embellished it with three gems and a golden crown. After I painted the crown gold I added a little coordinating distressed stickles.  I think the crown looks a little more like a jesters hat... but I like it.


I added a journaling tag to the front page that couldn't of been more true. The statement not only states that I was not real sure what the contents were going to hold but that whatever it was it would be something dear to my heart like this project has been since I bought it and the contents I added later. 

You can actually sense my enthusiasm and excitement by my wording and my handwriting. I usually write very small and precise, here my writing is large and hurried. I start off the journaling by stating that I can't believe I am finally putting it together!

Shall we turn the page?


This first layout, like all the layouts has coordinating scrapbook paper. I did however stamp some random images and added cut out patterned paper borders for more interest to the background.

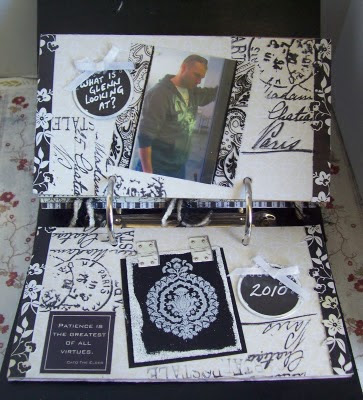
There is a combination of pictures, tags, a quote and a hidden photo and journaling as well. Can you see where the hidden elements are?


This is a picture of  Glenn looking at something. The picture is highlighted using a transparent photo frame. The tag on the side is challenging you to figure out what Glenn is looking at.


If you guessed that the photo above is where the hidden elements are, then you are right. As a fan of hidden elements on a scrapbook page I just love who ever thought of these sturdy hinge stickers. You can see them attached to the decorated cardstock above. The cardstock is decorated using a rub on,  embossing ink and powder on the sides.


What is hidden is the answer to the question that is being asked, "What is Glenn looking at?" It happens
to be his latest obsession, The Claw Machine. I have a closet full of crap toys to prove it!


I was teasing Glenn about this page and how the quote applies to how much patience he has to have in order to play these games. When in all honesty patience is just one of many great virtues that he possesses.

Let's turn the page...


The next layout that we are looking at is a little more simple but actually has more sentimental meaning for me.


I made my own journaling tag this time with my Cricut Machine, some paint and a few stamped images.

Glenn took me on a surprise trip to the beach for my birthday last year. Each and every minute was amazing! He rented me a ocean front suite, complete with a fireplace and jacuzzi tub. It rained for weeks before we went but while we were there we weren't even wearing jackets. The day after we left it flooded so badly there you could not get in or out of the coast. Someone new we needed this trip and blessed it. We fell in love all over again...


Glenn is just hanging out in the room in the photo above. I used a rub on directly on to the photo to make a frame and cut it out. The wording, "always", is also a rub on. I don't know who came up with this idea either, but rub ons are another one of my favorites. Quality rub ons that is.


The key with ribbon and the key hole are just two of the many embellishments that fill the pages of this little album.


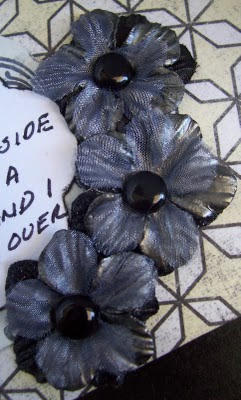
Anyone that knows my work knows that I am big on using the layered flowers too.

It is the stuff like these flowers, the key and keyhole and hidden elements just to name a few that keeps me doing scrapbooks the old fashioned way. I have admired many digital layouts, and because I create Custom Scrapbooks, I  have compared the profit margin of scrapbooking my way and the digital way.  I will admit it is hard to argue that point after looking at the figures, but is that what its all about? For some maybe, maybe they have not choice. But for me I would be giving up so much of what I love about scrapbooking and that's all the stuff!

OK, let's move on... shall we?


The patterned paper on the layout is pretty dark. I picked out a light colored paper to make borders from and used white rub ons, paint, and a white  pen for the words, embellishments and background for the date so that it would show up better, and pop off the page.


Because of the size of the pictures, I chose to design this layout on the side rather than crop down the pictures and cut out this great bench we found along a trail while we were doing some hiking on a camping trip.

All the photos have been matted with white mulberry paper to go with all of the other white elements on the page.

I added this grungeboard heart that has been painted red to coordinate with the outfit worn by Glenn in the pictures. It also adds some color to what would of been a black and white layout it.


The "G" is a grungeboard letter that has been painted white and then hand stamped with a handwriting background stamp. As you can see the ink was not dry yet and somehow was smudged a little. My first reaction is that it was ruined and then it grew on me and I kinda liked it.

"so loved" is a rub on, and is what actually started a chain reaction of other white rub ons that were added to the rest of the layout.

We have one more layout. Well, one more that Glenn will let us look at...


For this layout I added a pocket and border made from coordinating patterned paper, that has been embellished with rub ons, black pearls, and a charm w/ fibers.


I made the tag using my Cricut Machine, grungeboard, paint, pattern paper and a rub on. I have added a  heart charm w/ fibers to adorn the corner of the tag like the one that adorns the pocket. I love the quote displayed on this page. It states "Some people make the world a better place just by being in it". I know that my world is a better place with Glenn in it.


The pocket holds these three tags with fibers. Two of them are pictures of Glenn.


The third tag tells us the nature of the pictures and the dates the events took place.

This tag is another example of all the embellishments this book has, with little black pearls that line the bottom, like the ones that line the border on the opposite page. The patterned paper at the top and another heart and coordinating fibers.


Well, that's it for my new Purse Scrapbook. It not only looks like alot of my purses but holds alot of important stuff too!

I think that's it, let me ask Glenn one more time... ... ... Yep, that's it!  

Thank you for coming and sharing my Creative Spirit Challenge entry. I didn't know if  I was going to get it in on time because of some unforeseen circumstances, but I am glad that I did. 

Your comments and questions are always welcomed and enjoyed. Please add them following this post.

Until Next Time... Take Care!

Thursday, August 12, 2010

Elegant Gold Butterfly Bookmark or Pink and Black Floral Bookmark?


Not to long ago, Lesley was asking for some feedback for her Etsy Shop, Butterfly Garden Creations.
She asked us to list 10 of our favorite bookmarks on her blog site, also named Butterfly Garden Creations, in the hopes that it would help her to be more prepared for the holiday's. In return we would be entered into a drawing and have the opportunity to win any bookmark she has listed in her shop.

Well, guess who helped out with the marketing research? Yep...  OK, now guess who won the drawing for the bookmark? NO.... It was me!

Of course I could not make up my mind which bookmark I wanted. It was between the Elegant Gold Butterfly Bookmark, pictured above and below, or the Pink and Black  Floral Laminated Bookmark.


So, I told Lesley, to surprise me.  As you can see I received the Elegant Gold Butterfly Bookmark, and could not have been happier. I think the photo above really shows off just how pretty the gold butterflys are. 


Lesley even added my initails to the top. She used an L instead of an F because I am getting married this upcoming January. Wow, that is just right around the corner huh?

Thanks so much for the bookmark Lesley.  I hope that your holidays are filled with sales!

Until Next Time... Take Care !

Wednesday, August 11, 2010

Alchemy Orders Completed!


One of my favorite things to do, is for potential customers to call me up, actually now it would be get a hold of my through my Etsy Shop, Scrapping With Sherry, and request a custom order. Which is actually just a fancy way of saying they get a hold of me and tell me what they want. This is how I have been making cards for friends and family locally for years.

I love the challenge of them telling me what they have in mind as far as images and colors for example, what the must haves are as well as the must not's, and then creating a card based on their vision.

Besides the challenge of making a card according to their specifics, my favorite part is when I present them with the finished item and they love it! It still amazes me at how surprised they are when they see it for the first time. Just the look on their face is a compliment that I can't describe.


I had two of them to complete today. The first one, pictured above, is a birthday card for a 16 year old boy. She wanted a card with a guitar and white skulls, she preferred the card be black and white and be done in two days.


I not only used the patterned paper from the Rock Star Paper Pack for the background layers, but I cut out an image of a guitar with a craft knife to create my own embellishment. I added painted grunge board wings to the back for added interest.


She wanted white skulls so I painted a few grunge board cross bones and skulls to add since the images on the patterned paper were silver.
 

I added a touch of red to the card by hand stamping "You Rock" on a piece of white cardstock with Brick Red Distress Ink from Tim Holtz and then added the Distressed Embossing Powder in Brick Red. I didn't care for the plain white cardstock so I cut the middle out of a tag and replaced it with the hand stamped one I made. The inside has a "Happy Birthday" sentiment in rub-ons.

Tip: When Distressed Embossing Powder is used with Distressed Embossing Ink it ends up being light as there is not alot of coverage. To make it a darker color I use a coordinating colored distress ink. Any distress inks can be used for embossing too.


The second card is a friendship card. The recipient is a music teacher who has a passion for playing the piano . She did not want just black and white and decided that she wanted alot of her favorite color, red, to be added to the card.

I showed her a vintage card and suggested that the style and colors of the vintage browns would go good with the mandatory color red that she wanted. She did not like the look of vintage, so I resorted to using black and white with a red textured background. Since she wanted the card to have a good amount of red, I made the middle smaller than I would have otherwise. 


I hand stamped and colored the piano keys and then added them to the hand stamped, embossed musical background image, that makes up the middle portion of the card.


You can really see the texture of the embossed musical background in the photo above.


The tag says "You Are" and the sentiment on the inside says "Very Special To Me".

A black satin ribbon is what separates the musical image from the piano keys. I wish that I could of found a way to shape the musical image to look like a piano.


To finish the card I added a layered black flower with a white pearl in the center. I also added two black pearls to the two top corners of the musical background.

She is coming to pick this card up today. I have to admit that I am a little nervous. I like the card. But that may be the problem. Our taste is very different when it comes to most anything... I will just have to keep my fingers crossed! Update: She came by and picked up the card and loved it! We discussed her hiring me to create each of her grandchildren a canvass wall art for Christmas. She is going to place her order in a few weeks, through special request or Alchemy at my shop, Scrapping With Sherry.

I am really looking forward to doing these layouts for her. I have not had the opportunity to create like this in a while now.   

Thanks for coming by and taking a peek at what I've been up to. I have also been working on the list of books that everyone submitted during my giveaway. I should have it done within a few days.

Until Next Time... Take Care! 

Tuesday, August 10, 2010

Vintage Brooch Card


This morning when I announced the winner of my giveaway I also presented this card as a token of how I feel about all of the people that have been a part of my journey here in blogland so far. This vintage brooch card's sentiment, "You are my Inspiration", really says it all.

So, I am back this time to share with you how I made the card as well as a few more pictures.

As always, I started off by making the card itself using 65 pound cardstock. At the risk of sounding like a broken record, you always want to use heavy cardstock at least on your first layer. I cannot begin to impress upon you what a difference this makes in the quality of your card.

The patterned paper I used for the second layer is from one of my favorite's, Basic Grey the Shabby Collection. I went around the edge with a gold leaf pen for an added accent.


One of the elements that I was asked alot about today is the brooch image. This is simply a ephemera image from one of the Emphemera Books that Design Originals came out with. I cut it out, glued it to grungeboard for durability, added a layer of Crackle Accents by Ranger, let it dry and adhered it to the card with pop dots. It really does look like it's in a frame doesn't it...

Tip: I highly recommend that when you have a collection of ephemera images, that you copy them so that you can use it repeatedly, instead of being lazy like myself and just cutting them out and using them. Now I don't have another one, and I would of liked to have been able to make this card again for my Etsy Shop, Scrapping With Sherry.


I have had these gorgeous stick pins, in the photo above, for a long time. I know that I got them at JoAnn's. I want to say they were the maker to, but I am not sure. I tied a bow around the base of the beads with organza ribbon and then added a heart charm at the top by Blue Moon. Blue Moon makes beads and jewelry making supplies. You can find a large variety of them at Michaels. Because the stick pins are heavy I adhered it to the card and in the flowers, using glue strips, usually used for ribbon.

Tip: Before buying scrapbooking or card making embellishments that look like the heart charm used in this card for instance, look in your jewelry making section of your craft store. More often than not I have found pieces to use instead at a considerably lower price. 


The flowers are by Daisy Doodle. I layered two large ones and one small one on top to get this look. The brads are called Gold Wedding Pearl Brads, made by K&Company. I finished off the flowers by adding some Diamond Stickles by Ranger.

I'm not usually one to add so much glitz and glam to a card, but there are a lot of things that I have been  doing lately that I don't normally do. And you know what... I'm liking this new creative side of me. Or should I say creative sides of me?


Before any of the embellishmenst were added I adhered a strip of pink satin ribbon layered with white organza ribbon. You can barely see it in the photo above, but it looks like I have added a strip of white crystals on top of the layered ribbon, when actually I just added a few to both ends so that I did not waste a bunch of them that noone was going to see anyways. Believe it or not it took me a while before I learned that lesson. So that I didn't take a chance on tearing the tags I tied a bow using organza ribbon and stuck it on separately.

I made a couple of tags using white vellum with gold specks. I then went around the edges with a gold leafing pen. Using both tags I stamped part of the sentiment on one and the rest on the other. I then added three small pink crystals and attached both tags to the card using a small glue strip.

TIP: You have to be careful as to what type of adhesive you use on vellum. Most of them will show right through the vellum leaving a tacky, unfinished look. If I cannot use my adhesive in some way that I can hide the area that it has been applied to, I will apply a light coat of spray adhesive and attach immediately. Another technique that has worked for me is to use my Xyron Machines.


Whether you are here to learn about making cards or looking around for some inspiration, if you make something because of this post, I would love to see what you have created. Please send me an email with inspired by vintage brooch card in the subject line. Please Let me know if I have your permission to show your work here at my blog, Scrapping With Sherry

Thanks for taking the time to visit today. Your comments are welcomed and enjoyed.

Until Next Time... Take Care!
Related Posts with Thumbnails
PitaPata Dog tickers