Showing posts with label other crafty creations. Show all posts

Monday, October 11, 2010

Altered Vintage Bottle


This is the first altered bottle I have ever made. However it will not be the last. These little artistic  creations could be habit forming! I know that I am already sorry I didn't buy the whole box of bottles instead of just a few. What was I thinking?

For my first bottle project I used a photo of one of my favorite images, my granddaughter, Destiny. Since this was a vintage piece, I wanted to do something special with her picture like a photo transfer or something. On the other hand I really wanted to get started on the design so I copied a photo and printed it on mulberry paper. I just love this stuff. It is adhesive backed and tears just like regular mulberry paper does.


Above is a close up of the photo printed on the mulberry paper. You can see the texture that this paper provides. I feel it goes really well with the vintage style


Since I started off printing Destiny's picture on mulberry paper I attached  mulberry paper as the first layer on my bottle. The only place you can see it from the front is a little on the upper neck area and right below the neck of the bottle. This pattern has holes in it so that you can still see the color and age of the bottle. It is actually more sheer than it looks in this photo.

I wrapped a crotchet and lace trim around the bottom and secured it with a safety pin. I added a vintage handbag charm to the safety pin and then added two buttons. The buttons are not old but are vintage inspired buttons from Germany. To finish off the bottom portion, I wrapped a strand of faux pearls around the bottle a few times.


Above Destiny's photo I wrapped a lace with pearls around the bottle quite a few times. I added a pearl accent to the Tim Holtz vintage button after i placed it over the wrapped lace and pearls. I also attached a cross, heart, key and woman's torso to a safety pin before securing it to the bottle.


I had the flowers in the photo above on a ribbon. I had planned to remove the flowers and place them here and there. I started to wrap them around the neck of the bottle and Walla!


My bottle did not have a cap so I took some adhesive backed cork and cut off a one inch slice. I rolled it up tightly until I had enough to fit into the top.

I attempted to search the Internet for information about creating something for an altered bottle with no lid. I did read about bees wax, unfortunately the author was not addressing the beginner. I was hoping that you could help me finish my bottle. If you have a technique that you use or know of a good link that I may learn how I would sure appreciate it.

Thank you for sharing my altered bottle with me. I almost forgot! I wanted to share with you the photo I am going to be using on my next altered bottle...


This is my granddaughter, Jazmine. Is she not going to make my bottle beautiful! I printed her photo on the mulberry paper too. The outfit that she is wearing in this picture was made by my mother  

Thanks again for coming by and don't forget to add your contact information when leaving a comment so that I can visit. I apologize for being a little late on returning messages but I have had my grand kids the last few days and they kept me busy.

Until Next Time... Take Care


Sunday, October 10, 2010

Fragments Frame


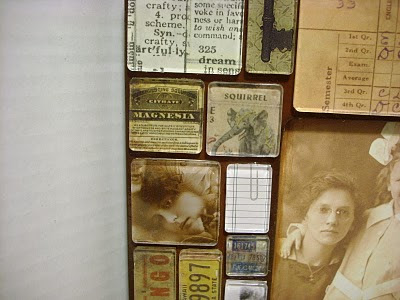
I wish that I could say what I call my fragments frame, is my own design, but it isn't. It is inspired from one of my favorite designers, Tim Holtz. It is not a secret that i admire his work.  I have loved pieces such as this for as long as I can remember and have finally made a few of them.

I made one for myself and one for my Etsy Shop, Scrapping With Sherry. I will post the one that I made for myself at a later time. I actually thought that they were going to be a fairly quick to put together. Boy was I wrong!  Of course you have to take into count that I tend to be indecisive and I rearranged the fragments a few times. It's not important exactly how many times...


I wanted to show you that the frame not only sits alone but also looks nice in an easel type holder. I have also added a hanger in the back if you want to showcase it on the wall.

I started the picture frame by painting a square frame with a teddy bear brown acrylic paint and then added a few different distress inks until I was happy with the outcome.


After I finished obsessing over the shade of brown that was going to be ultimately covered up, I set the frame aside and started to find vintage images to attach to my fragment pieces.

Once the fragment pieces were finished I then attached them to the frame.


Some of the images included street signs, ration stamps, theatre tickets and a Kodak transparency photo.


Other images were license plates, medicine labels, paper and vintage children's playing cards.

One of my favorite images on this frame is the picture of the lady above.


She looks so deep in thought... maybe longing for a lost love.


Dictionary definitions, part of a key, a piece of a report card, a travel sign and another vintage photo make up the upper portion of the Fragment Frame.


A few more of the pieces that are shown above include a pop cap, a fragment of a train ticket and clock, room service sign, snippet of an application and ruler, musical notes, the free space of a bingo card and another road sign.


Of course there are more than what I have mentioned but I will let you find them. 
I am linking my Fragments Frame to the Creative Spirit Challenge at Cindy Adkins blog, Whimsical Musings. I have already had a chance to view some of the entries and they are amazing.

Thanks for coming by. I have a lot of stuff to share with you this week so swing back by if you have time. I have a few more projects, a few new tool reviews (one of them not to good), my Etsy Shop news and an announcement about my up coming giveaway. It's going to be bigger and better than the first one, so you don't want to miss that!

Until Next Time... Take Care

Saturday, October 2, 2010

Altered Spooky Frame


Today I took a break from making cards, tags and other papercraft items to work on a project with my granddaughter. This is our "Spooky" shadow box picture frame.

Let me introduce you to the artist...


This up and coming paper artist is my granddaughter Destiny.

We really had a great time constructing the elements and altering embellishments to create a "Spooky" scene.

We painted and sanded down the outer frame to get a shabby look. I had suggested that we use crackle paint on the outside, however Destiny did not care for the colors that were available. She's the boss!


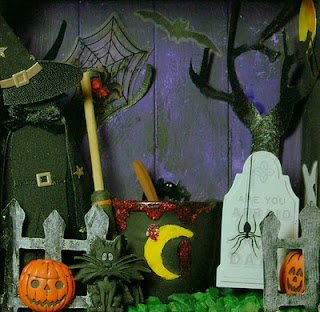
In this close up shot you can see how the back wall has been painted purple with black dry brushed on. The walls, ceiling and trees are painted black. There are rocks glued to the bottom and painted green to look like grass.


A yellow moon is in the right hand corner against the black wall partially hidden behind the tree to enhance the night time "Spooky" look.


Under the tree sits a headstone that says "Are You Afraid of the Dark?", with a spider hanging down. You can see a pumpkin, that is actually a button, peeking through the fence. The fences were made from grungeboard that has been cut using a die and Cuttlebug. We then painted them black and then dry brushed them with white paint. Can you see a ghost peeking from behind the tombstone?


Above is another view of the fence with the crazy cat and a pumpkin. We didn't know if the cat is crazy or hypnotized. 


Here is the witch with her broom, her pot of ...  What do you think she is brewing up?  There is a spider on the back and something red is bubbling over! Eek!! In back of the witch is another tree with a spider web.


Thank you for coming by and taking a peek at our "Spooky" picture frame.
This is one Halloween project that I will treasure for a lifetime. To me it's perfect!

Destiny and I are linking our altered "Spooky" picture frame to The Artistic Stamper's Creative Team Blog for October Challenge. The theme is layers.

Until Next Time... Take Care! 

Sunday, September 19, 2010

My ATC Holder Design Entry


The Blissfull ATC Swap Site is having a ATC Holder Design Contest. I hemmed and hawed over whether or not I was going to enter this challenge until I ran across this cute, box made to resemble a handbag, at a garage sale on Saturday. It was the perfect size for my ATC's, and I loved the shape of the box. My first thought was to embellish it as a purse, however the more I thought about what it was going to hold, the more I changed my mind. I decided to create a vintage piece of worn luggage. For me the suitcase represented travel, and our ATC's definitely travel all over the country from one swapper to another.
Voting for this challenge starts on September 20th, and only lasts for a few short days. All of the entries can be viewed at the Blissfull ATC Swap Site. After viewing the entries if you would like to vote for mine would you please submit your vote by sending an email to blissfullatcswap@gmail.com.

Thank you for stopping by to view my entry and taking the time to vote, I really appreciate it.

Below are a few more photos of my Vintage Luggage piece for you to view.


Above is the Vintage Luggage Tag.


A closeup of the Vintage Stickers.


A few more stickers...


And more stickers...


Above is a closeup of some of the wear and tear that I created to enhance the aged look of the vintage luggage.

The winner of the ATC Holder Design Contest will have the opportunity, if they wish, to show how they made their entry. For that reason I have held off on sharing the techniques and products I used to create my Vintage Luggage piece.

Please don't forget to vote at blissfullswap@gmail.com, starting on September 20th, for a few short days only. Thanks!

Until Next Time... Take Care!

Thursday, August 5, 2010

First Giveaway!


30 Days ago this Saturday, August 7th I published my first post here on Scrapping With Sherry. Who would have known that I was going to love it so much. Certainly not me...

So I thought... What better way to celebrate and say thank you to all the people that have supported me with comments, kind words and inspiration... became followers and friends... and have helped me when I had no idea what I was doing... then to have a giveaway.

I made the tag pictured above to decorate for the giveaway. Here's a few more views.


I embossed a die cut of a bird with distress embossing powder. This stuff is a hit with me. It not only covers well, but gives the image a great distress look and feel. A matter of fact it feels like sand paper.


I also added 3 layered flowers in coordinating colors. I added a little something extra by embellishing each one with a pearl.


I got a chance to try a new technique called, "Shabby Chic", on the first layer of the tag. After cutting a die cut tag made of grungeboard with my CriCut I painted it pitch black with a paint dabber. After the tag was good and dry I handstamped flourishes with distressed embossing ink. I then applied clear embossing powder and heat embossed it with my heat tool. Next, I covered the entire tag including the embossed images with my paint dabber using snow cap. After the paint had begun to dry, but was still tacky, I took a damp rag and wiped over the embossed designs to remove the excess paint. What do you think? I added the picture above, so that you could get a better peek at the "Shabby Chic" look.

I hope to see you back here on August 7th to help me celebrate and find out how you can win some great stuff for your craft stash. It's only for 3 days so don't be late.

Until Then... Take Care!

Tuesday, July 20, 2010

The Tooth Fairy

My granddaughter came to spend the night and she lost a tooth! Well, being away from home she did not have her tooth fairy pillow and was concerned that the tooth fairy would not know how to find her tooth without it. Well, we couldn't have that! Being the crafty person that I am I jumped at the chance to put together a tooth fairy tin. She helped pick out the elements and proved once again that we have another papercrafter in the family!


Above is a picture of my granddaughter, Destiny, showing of her new smile. Below is a picture of the Tooth Fairy Tin we created together.


We just know for sure that the tooth fairy is going to have no problem finding her tooth with all this bling!


The tin was filled with metal tags at one time. The pattern paper on the side is actually a border sticker from the Brenda Walton Collection, while the top is a tag and the word sticker that says "imagine" is from her collection too. The flower stickers, butterfly and the tooth are all from Jolee's By You and the bling is by Mark Richards.

Destiny reminded me so much like myself when I first started papercrafting. She wanted to put the whole package of bling on. I don't know about you but when I first started I didn't know when to stop when it came to embellishments, stickers and such! I look back at my work then and I have to laugh a little, but I wouldn't trade those first scrapbook pages for anything.

Thanks for visiting! Your comments are like a gift and I treasure them all. Don't forget to leave your contact information if you would like for me to reply. Until next time... Take Care!
Related Posts with Thumbnails
PitaPata Dog tickers