Showing posts with label Tags. Show all posts

Friday, September 17, 2010

Mike's First Day of School Tag


I made this tag for the Tag Tuesday Challenge at Kard Krazy. The theme is school, so I made a tag using one of my favorite photo's of my brother's first day of 1st grade. My brother is 28 years old now! I wonder if there are any vintage tag challenges going on I could link up to? 


I had actually put the photo on the tag and had planned on adding some school themed patches, however it was just far to busy so I decided to use this quote from Quick Quotes, along with a few buttons. Since the quotes are printed side by side on vellum I couldn't just adhere the entire piece over the photo so I positioned it the best I could and traced my brothers image and then cut it out. I think it turned out pretty well. A lot better than I thought it was going to! 

A Tip: When you are attaching vellum like the quote above and you do not have anything to hide your adhesive behind or want to blend the vellum into your image like I have done on my tag, simply run your tag through a Xyron Adhesive Machine for complete coverage and adhere. I usually finish the look by rubbing the vellum into my image with my fingers. If you do not own a Xyron you can spray the vellum with a light coat of spray adhesive instead. 

I am also linking this tag to Top Tip Tuesday.


I used a scrap piece of chalkboard themed scrapbook paper I got at the dollar store years ago for the background on the bottom of the tag. I added embellishments like the felt eraser from Jolee's and JoAnne's to create a  blackboard scene including chalk that is simply white paper that has been rolled up. To finish it off I wrote my brothers name on the box and added the little sign that said First Day of School to tell the story of the tag without journaling. The alphabet ribbon that was used to separate the two different elements of the tag is from American Crafts.

I want to thank Kard Krazy for this challenge. I had fun creating the tag. It's been a long time since I have worked with school themed products. I also want to thank Top Tip Tuesday for the chance to share my project and tip as well as the chance to win some great prizes.

Until Next Time... Take Care!

Tuesday, September 14, 2010

Vintage Halloween Card and Tag Set


This is a Vintage Halloween Card and Tag Set that I made for a challenge and have brought out of the archives to post and kick off the holiday season and all of the great creations that are to come here at my blog and my Etsy Shop, Scrapping With Sherry.

I started out just making a card, but I had some left over supplies and decided to make a coordinating tag to make a matching set. 

I absolutely love the Vintage Graphics that I used and wish that I could tell you, and myself for that matter, where I got them from but I had them for so long that I don't remember. Also, a lot of the supplies that I still have today have been organized and put into folders, holders and handy storing cases before I ever knew that I would be blogging or entering my work in anything and did not bother to keep information on suppliers or names of products.  Can anyone relate with this? I regret it now but it's a little to late for that.

There is not much that has not been done to this card to distress and age the look from tearing the edges to applying antiquing solution. To finish off this set, I sprinkled a great product called diamondz in the color onyx randomly over both the card and tag. I love this stuff and will be pulling it out to add to alot of my Halloween creations this year.

Thanks for stopping by. I hope that you enjoyed the Halloween Card and Tag Set as much as I enjoyed making them.

I have linked this set to the Halloween Challenge at Cardz TV. If you want to see a large list of fabulous Halloween cards be sure to check it out.

Until Next Time... Take Care! 

Monday, September 13, 2010

Featured Artist


I am truly honored to have been chosen to be a Featured Artist on Cindy Adkins blog, I Owe it All to Him. One of the biggest compliments that I could receive is for someone to acknowledge my work for more than just its beauty but what it meant to them as well.

Cindy beautifully writes about what one of my creations meant to her through her own reflection and thought provoking questions for the reader as well. This article shows that she is a artist in every way.

If you would like to read the article that she wrote simply follow this link, Featured Artist on I Owe it All to Him.

Thank you Cindy!

Until Next Time... Take Care!

Sunday, August 8, 2010

My Favorite Song


This week's link party at Cindy Adkins blog, I Owe it All to Him, is "What is your favorite song?" This was easy for me. Even though I have a new favorite song every time I turn on the radio, there is only one song that I have loved since I was a little girl and that's Amazing Grace. 

A matter of fact I knew the moment that I entered Cindy's blog, I Owe It All To Him, that it was going to be a blog that I would be following. I instantly felt connected in some way, simply because  Amazing Grace was playing. I had previously added a video of  LeeAnn Rhymes singing Amazing Grace to the right, on my sidebar, however it was causing my blog to download very slow. So, I have included the link so that you may watch the video on YouTube. She sings it absolutely beautifully!
My grandmother's name was Grace. She's no longer with us, however, when I hear Amazing Grace it takes me back to memories of her. I made the tag pictured above for this link party today. I copied an old black and white photo of her and I onto mulberry paper and then added it to the tag.


I didn't want to add a lot of embellishments because I  wanted to leave as much of the picture exposed as I could. So I chose to simply add a few layered flowers with brads, a black bow and a small cross.

There were a few more photos that I had copied onto the mulberry paper at the same time as the one I used for the tag, so I have decided to use them along with this tag to make a scrapbook layout. I will be sure to share the pages when I have them completed.

I also want to take this opportunity to say Thank You to Cindy for hosting these fun and thought provoking link parties. I appreciate all of the hard work and dedication it takes to continue to put these together week after week. 

I am having a giveaway to celebrate the first 30 days in blogland! You can enter by following the instructions on the next post titled "Giveaway Starts Today!"

Until Next Time... Take Care!

Wednesday, August 4, 2010

Wandering Ghosts Tag

When you think of the word accident it's usually not associated with anything positive. Unless you are a crafter and then some of the best techniques and looks have been an accident. Here's mine...


When I started the tag I applied a layer of picket fence crackle paint. My plan was that is would crackle and I would work black ink into the cracks and wipe the rest off. Well, I didn't apply a thick enough layer so the paint did not crackle the way it was supposed to. Instead after applying the black ink I got what I feel is the look of an old house or barn, you know the ones with the washed out untreated wood.  


You can see the background better in this closeup pictured above. You will have to let me know what it reminds you of. I really like to hear peoples different interpretations of artwork. Anyway,  I decided to go with two stamps from the Tim Holtz collection. One is the phrase above, "Not all who wander are lost", and then the image below. When I attached the tags I used staples instead of adhesive for something a little different and fun.


When I stamped the image of the people pictured above, I grabbed the wrong black ink and got this light black image instead of the dark black image that I wanted. Well, another accident gone right! I really liked it. It reminds me of ghosts and makes the phrase that I chose even better!


Since nothing was going the way I had planned, I didn't know how I was going to finish this tag off, but  my desire to use my new Tim Holtz rular is what prompted me to add the fasteners to the side, so I could use the hole punches. Plus it also gives me a chance to use my texture hammer and give the fasteners a new look. There was still something missing so I masked off my image and stamped a background stamp randomly around the tag with the darker black.

To finish the tag off I chose 3 different types of fibers and added them to the top of the tag. So, what do you think about my accidents? I personally love them and hope I make more!

Thanks for coming by for a visit. On your way out if you want to grab my new button you are more than welcome too. You may want to grab it as a reminder to yourself that this Saturday is exactly 30 days since my first post and I am going to celebrate it by having my first Giveaway!

Well, I am off to post my new tag, "Wandering Ghosts" in my Etsy Store.

Until Next Time... Take Care!

Tuesday, August 3, 2010

Birds In Waiting Tag Set

I had a Aha! moment this morning. I started an Etsy Shop, Scrapping With Sherry, not with the expectation of getting rich, I just wanted to fund my crafting a bit. I am sure some of you can relate to how much it costs to craft, especially when you are a self professed craft supply collector! Well, I have been going into this with the goal of making items that I can make a profit on. Something that can be made repeatedly with craft supplies on hand. Sounds like a descent business plan right? So, whats the problem? My creativity and inspiration have been smothered. 

This morning I decided, no more! I am going to make what I am inspired to make... I am going to go back to having fun... I am going to be me! I will list the things that I make and if they sell and I decide to or even have the stuff to make another one great. If I don't, that's OK too. Creating is such a big part of who I am that if I can't do that freely I am not complete. Maybe it isn't even in the cards for me to have My Etsy Shop, and you know what, that's OK too. 

Ready to take a look at what I was inspired to create today?


I have decided to call them "Birds in Waiting Tag Set" I decided to make each one a different  monochromatic color scheme. Besides the fibers and two of the images, everything else that I used to make this tag set are craft supplies by Tim Holtz. I am currently having a great time playing with his products. Here are a few close ups.


All three of the tags have decorated tiles attached. I just love the way you can altar these to look like anything that you want. Very fun!


Stuck a couple little blue birds on the blue monochromatic tag. I forgot to mention that the little birds are not Tim Holtz products either. They are actually made by Jolee's. I ran a swivel clasp from the top of the birdcage image and up through the fibers to give the look of the birdhouse hanging from a chain. I even finally got to use my new texture hammer, even if it was just to give a brad a few whacks!


This bird was hand stamped and then embossed with the distress embossing powder. Love this stuff. It adds a whole new look and feel to embossing! And what's even better is you can't overheat it... Something I tend to do with regular embossing powder. 

Tip: When you use the distress embossing powder make sure that after you apply the heat to let the powder cool off completely before you wipe off the releasing crystals. It bonds to the paper as it cools and if you don't wait the embossing powder will come off.


I hand stamped and applied the distress embossing ink to this bird image as well. All the tags have a metal embellishment attached. I love how all the trinket pins and the muse tokens have fun and inspirational words on them. The color of the green tile didn't photograph well and doesn't look like the true green color that it is.  

I also sprayed each one of the tags lightly with a coordinating color of perfect pearls and a mixture of water with my mini misters. Unfortunately the photos didn't pick up the light shimmer.  

Well, what do you think? I'm happy with the set and I had fun. I would be lying if I said I didn't care whether anyone likes my stuff or not, but if not, that's OK too...

Well I am off to list this set in my Etsy Shop. Thanks for stopping by, and thanks to everyone for all the support. Everyone has been awesome!

Until Next time... Take Care~

Sunday, August 1, 2010

My Favorite Word


Cindy Adkins is having a link party at her blog, I Owe it All to Him. This week's link party is
"What is your favorite word?" I have literally known about this for a while now, but  as usual I could not decide what word I wanted to use. I can be so undecisive sometimes. It really drives me nuts! 

I finally came up with one, which is a good thing, it ends tonight! My word is Hope. Why? For one it is such a positive word. Even when times are tough, as long as I have hope, then there is inspiration to keep going. I know that things will work out. 


Just like this tag states... To have confidence. This is so true for me. When I have hope, I have a positive outlook. When I have a postive outlook, I then have confidence in the situation and myself. Hope gives you something to wish for. When you have hope... anything is possible! 


Thank you Cindy for giving me something to think about this week. Thank you for giving me hope!

I made this inspirational tag I call "Hope" for Cindy's link party. I used the different shades of brown Tim Holtz Distress Inks, the blended batik technique, various stamps, Prima flowers and MM fibers. One of the reasons I included the close up, above, is so that you could see the shimmer I added to the tag using a shimmer mist I made with water and Perfect Pearls blended in my Mini Misters.

Until Next Time... Take Care!

Thursday, July 29, 2010

Wedding Gift

It's here! I was working on a card to take to my newest family member, Karen,  when I heard the familiar sound of my mailbox closing shut. Being a craft swapper and online shopper the mail is always a pretty exciting time of the day. Yes, I have a life... Anyway today was extra special. I received the tag that Cindy Adkins made me for her Surprise Day that she usually holds at her crafting blog site, Cindy Adkins' Whimsical Musings. However this time she had her Surprise Day at her inspirational site, I Owe it All to Him, because of a link party that I participated in last week. Here is my Vintage Tag.


Isn't it beautiful... I am so lucky to receive such an amazing gift. The Lord has definately blessed  me this last week in so many ways. Below is a close up view. Cindy even included a bingo card, because that is where Glenn and I met Karen.


The tag even came in a decorated package that I can store my tag in for safe keeping. (Pictured below)


For those of you that have not been following my blog, last week I was given an amazing gift from a very special lady named Karen. From that story came so many blessings. If you are interested please read my blog posts titled, "The Angel Named Karen" and "The Gift". You will not only know the story behind why I received the honor of Cindy making me this tag for the Surprise Day on her blogsite, I Owe it All to Him, but I believe that you will be inspired and have a renewed faith that there are angels among us.

Thank you Cindy! You are an amazing woman. I am so blessed to have met you.

Until next time... Take Care! 

Sunday, July 25, 2010

Blended Batik Monochromatic Tag Tutorial

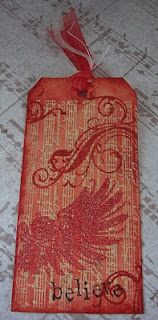
On my Yahoo! Group, PBS Swappers, a fairly new papercraft swap group, we did a monochromatic project challenge for week #30.  For my project I chose to do a Blended Batik Monochromatic Tag. A few of the members were wanting the directions, so here they are. Be easy on me this is my first tutorial.


Pictured above is the finished Blended Batik Monochromatic Tag.


Pictured above are a few of the supplies that are used for this project. Tim Holtz Distressed Inks in "walnut stain", "worn lipstick", "fired brick" and the embossing ink. Tim Holtz Distressed Embossing Powder in "fired brick" and Clear Embossing Powder by Ala Mode.  The Tim Holtz Blending Tool, the Ranger craft mat, a tag, Tim Holtz Clear Stamps "Regal Flourish" and a wood mounted background stamp by Anna Griffen.

Not pictured above, you will also need a stamp with sentiment, acrylic block for clear stamps, a iron, a piece of  newspaper, a heat gun and a piece of paper or tray to catch the embossing powder with.


First you will take your "fired brick" distressed ink pad and with the blending tool you will ink your tag along the sides. Be sure to use your craft sheet when blending the ink. I stamp some color onto my craft mat and work the ink into the tag with a circular motion for a well blended look. Using your heat gun, dry the tag thoroughly before going on.


Next you will ink your background stamp with the clear embossing ink and apply to your tag, using even pressure for a clean and crisp handstamped print.


After applying the clear embossing ink you will then apply the clear embossing powder. Next you will turn your tag over your tray or your piece of paper and shake the tag to get the excess embossing powder off. I usually like to give the back of my project a few good flicks with my fingers.


You will now melt the clear embossing powder with your heat gun.


This is a close up shot of your tag. If you look closely you can see the difference between the left hand side of the tag, where the clear embossing powder is melted and the right hand corner where it is not.


Next you will take your distressed ink in "worn lipstick" and ink the entire tag. Again, work with your craft mat by applying ink to the mat first and work your blending tool into the ink and onto your tag in a circular motion for a blended, even look.


See how the embossed image resists the ink in the photo above?


Next you will place a piece of newspaper print on top of your tag and with your iron on high, iron over your tag. This will remelt the embossing powder and absorb it into the newspaper, which gives you your Blended Batik look. Continue to iron and slowly remove the newspaper while it is still hot. If you wait till it is cool it will stick. Simply get it hot again and it will come right off.


Above is a close-up view of what your tag and newspaper will look like after you use the iron. See how the newspaper absorbed the melted embossing powder?


Next ink the right side of the wings with clear distress embossing ink and handstamp directly onto your tag. This is what is nice about clear stamps. You can see exactly where you want your image to be placed.


You will then sprinkle on your distressed embossing powder in "fired brick".  After you have your image covered completely, turn your project over and shake the extra off onto your tray or paper. Next melt the embossing powder with your heat tool. The above is a close up view of what your project will look like after the embosssing powder is melted. You can not overheat distressed embossing powder.

A Tip: You always want to make sure that you shake up your distressed embossing powder before you use it to make sure that all the powder and release crystals get mixed up evenly, or when you get to the end of your bottle you will not have enough of the release crystals for the proper effect.


You will then take the flourish image from your clear stamp set and stamp on random spots on your tag with distressed ink in "fired brick". I stamped once in the upper right and left hand corners and the lower right corner as well.


Using your distress ink in "walnut stain" you will stamp the sentiment, "believe".


Your final step is to apply ribbon and fibers to the tag. I used a 1/4" red organza ribbon and two different kinds of white fibers by Making Memories.


Above is another view of your finished Blended Batik Monochromatic Tag. I guess I could of threw in the word distressed in there to but it would have been a little much.

I Hope you enjoyed the tutorial. If you have any questions, please feel free to ask me in the comments section and I will be happy to get back with you. Of course comments are always welcomed and considered a gift.

Until Next time... Take Care! 
Related Posts with Thumbnails
PitaPata Dog tickers