Showing posts with label all occasion card. Show all posts

Wednesday, October 6, 2010

Custom Card with Extras


This is a card that I made for a customer as a Custom Order through my Etsy Shop, Scrapping With Sherry. Her request was for a card for her sister's birthday that also incorporated a tag or bookmark in some way. What I did was construct a card that held two tags or bookmarks, depending on your preference. One with a sentiment and one for her to add her own words to her sister.

We discussed different color schemes and decided to go with the tan and black for a classic look. Her sister is very special to her and she did not want any old ordinary birthday card.


Here you have the cards 3 different parts when the tags or bookmarks are taken out of their pockets.

The sentiment has been stamped on using black soot distress ink. There has also been a partial image of a clock hand stamped in Versamark for an added touch. The sentiment reads, "Time is a companion that goes with us on the journey, It reminds us to cherish each moment because it will never come again. What we leave behind is not as important as how we have lived." This is a sentiment found in the Tim Holtz collection. I think it is quite fitting for a birthday.


The sentiment is the reason that I went with stamping the clock image not only on the smaller tag but on the larger one as well, but this time I stamped it in the darkest brown I could find.

I like how on this close-up of the clock face you can also see the texture of the felt is the specialty cardstock I used for the background.


I made 3 flowers using my Cricut and Georges Basic Shapes Cartridge. I started by using a tan cardstock that coordinated with my patterned paper. I then hand stamped various background images by Anna Griffen on each petal with the same black ink I inked the edges with to define the flowers so that the petals did not all run together. After running the petals through a crimper, I attached them together using a black rose brad by Recollections. After I bent some of the petals and added a few pop dots here and there so that the flower would keep its dimensional look, I randomly added a clear glaze.


I am happy with how the card turned out and plan to make more using different patterns and colors. It's just a fun and different type of card.

Thanks for coming by and seeing what I have been up to... I am actually going to make myself sit down and add items to my store now. The poor shop is pathetically empty. I guess some day when I am rich I can hire someone to do all the business stuff and I can just craft. But until then I better get busy. Ugh!

Until Next Time... Take Care

Tuesday, August 10, 2010

Vintage Brooch Card


This morning when I announced the winner of my giveaway I also presented this card as a token of how I feel about all of the people that have been a part of my journey here in blogland so far. This vintage brooch card's sentiment, "You are my Inspiration", really says it all.

So, I am back this time to share with you how I made the card as well as a few more pictures.

As always, I started off by making the card itself using 65 pound cardstock. At the risk of sounding like a broken record, you always want to use heavy cardstock at least on your first layer. I cannot begin to impress upon you what a difference this makes in the quality of your card.

The patterned paper I used for the second layer is from one of my favorite's, Basic Grey the Shabby Collection. I went around the edge with a gold leaf pen for an added accent.


One of the elements that I was asked alot about today is the brooch image. This is simply a ephemera image from one of the Emphemera Books that Design Originals came out with. I cut it out, glued it to grungeboard for durability, added a layer of Crackle Accents by Ranger, let it dry and adhered it to the card with pop dots. It really does look like it's in a frame doesn't it...

Tip: I highly recommend that when you have a collection of ephemera images, that you copy them so that you can use it repeatedly, instead of being lazy like myself and just cutting them out and using them. Now I don't have another one, and I would of liked to have been able to make this card again for my Etsy Shop, Scrapping With Sherry.


I have had these gorgeous stick pins, in the photo above, for a long time. I know that I got them at JoAnn's. I want to say they were the maker to, but I am not sure. I tied a bow around the base of the beads with organza ribbon and then added a heart charm at the top by Blue Moon. Blue Moon makes beads and jewelry making supplies. You can find a large variety of them at Michaels. Because the stick pins are heavy I adhered it to the card and in the flowers, using glue strips, usually used for ribbon.

Tip: Before buying scrapbooking or card making embellishments that look like the heart charm used in this card for instance, look in your jewelry making section of your craft store. More often than not I have found pieces to use instead at a considerably lower price. 


The flowers are by Daisy Doodle. I layered two large ones and one small one on top to get this look. The brads are called Gold Wedding Pearl Brads, made by K&Company. I finished off the flowers by adding some Diamond Stickles by Ranger.

I'm not usually one to add so much glitz and glam to a card, but there are a lot of things that I have been  doing lately that I don't normally do. And you know what... I'm liking this new creative side of me. Or should I say creative sides of me?


Before any of the embellishmenst were added I adhered a strip of pink satin ribbon layered with white organza ribbon. You can barely see it in the photo above, but it looks like I have added a strip of white crystals on top of the layered ribbon, when actually I just added a few to both ends so that I did not waste a bunch of them that noone was going to see anyways. Believe it or not it took me a while before I learned that lesson. So that I didn't take a chance on tearing the tags I tied a bow using organza ribbon and stuck it on separately.

I made a couple of tags using white vellum with gold specks. I then went around the edges with a gold leafing pen. Using both tags I stamped part of the sentiment on one and the rest on the other. I then added three small pink crystals and attached both tags to the card using a small glue strip.

TIP: You have to be careful as to what type of adhesive you use on vellum. Most of them will show right through the vellum leaving a tacky, unfinished look. If I cannot use my adhesive in some way that I can hide the area that it has been applied to, I will apply a light coat of spray adhesive and attach immediately. Another technique that has worked for me is to use my Xyron Machines.


Whether you are here to learn about making cards or looking around for some inspiration, if you make something because of this post, I would love to see what you have created. Please send me an email with inspired by vintage brooch card in the subject line. Please Let me know if I have your permission to show your work here at my blog, Scrapping With Sherry

Thanks for taking the time to visit today. Your comments are welcomed and enjoyed.

Until Next Time... Take Care!

The Winner Is...


I want to thank all of you who took the time to come and enter my first Celebration Giveaway. I made the card pictured above with each and every one of you in mind this evening while waiting for midnight. I was going to make a thank you card, however this sentiment seemed so much more fitting and comes from my heart. All of you that I have met and had the opportunity to chat with, share stories, encouragement, the link parties and challenges. I could go on and on... but because of you and all of these experiences, my creativity and enthusiasm has changed and for that I'm thankful.

You Are My Inspiration...

Three days went by way to fast, but I had a great time doing the giveaway. I had a lot of fun reading your comments and getting to know some of you a little better. I feel that new friendships were started and that's my prize for this giveaway!!

Are you ready to find out who the lucky winner is? Cross your fingers and follow the link below...


Congratulations! You will need to send me your mailing address so that I can get your package mailed off to you and on it's way home. 

To determine the winner, I used Random.org., True Random Number Generator.

Regardless of whether or not you won this giveaway, we are all winners. Look who we are... We are blessed with the gift of  creativity. You can't win that...

Thanks again to everyone who participated. If you are interested in how I made the, "You Are My Inspiration" card, I will be posting more pictures and instructions later today.

Until Next Time... Take Care!

Friday, July 30, 2010

Vintage Angel Card


I created several cards for my angel, Karen, this week. However, none of them seemed to be "right". I don't care if you create cards, scrapbook pages, jewelry or toilet paper, you know what I mean when i say nothing seemed "right". It usually takes me awhile to create anything from design to finish because I am always second guessing myself, but this was ridiculous!

I wanted to have it done yesterday, because tomorrow we are picking her up to go play bingo and it will be the first time I have seen her since she gave Glenn and I her wedding ring. So, the card pictured above is what I came up with... What do you think? Before you decide, here are a few more views.


This a closeup of the flowers that I made by layering Prima Flowers and adding a pearls to the centers.


And then this final picture is a close up of the tag that states "You Are". On the inside of the card I stamped the rest of the sentiment which states "Extraordinary". This could not be more true. She is most definitely an extraordinary woman. One does not meet woman like her often.

What I liked about the photo above is it really showed off how I painted on Crackle Accents to give the picture a subtle crackle effect. Love that stuff!

Wish us luck tomorrow at bingo. After last week we are going to need it. LOL!

Until Next Time... Take Care!

Thursday, July 29, 2010

Gypsy Angel


A dear friend of mine, Kim, has redone her blog, Gypsy Angel.  I could not be happier for her. When I was reading up on how to blog, because a little over 2 weeks ago I had never had one and quite honestly had not read very many of them, yet time and time again I would read that the best advice is to be true to yourself when creating your blog. When I received the email that she had redone her sight today with the help of our new friend, Cindy Adkins at I Owe it All to Him, I hopped on over to see what was up.

I was in awe at the changes she had made. And although the physical changes as well as the name has changed, the most important thing is her voice has changed. It's the Kim that I share thoughts and ideas with everyday. It's the Kim that loves the lord and loves to craft. Plain and simple, it's Kim.  So, please let me introduce you to a dear friend, Kim and her new site, Gypsy Angel. I am sure you will be as impressed as I am with the changes she has made.

The photo above was cropped from a card I made for a friend, shortly after I first found my love for making cards.

Congratulations Kim!

Until next time... Take Care! 

Thursday, July 15, 2010

Enjoy the Journey

Tomorrow morning Glenn and I are leaving for a camping trip. I really wanted to get a blog post done of something different than a card before I left, so I was working on various scrapbook layouts. I say various because nothing was working. I just was not inspired to work with the photos that I had and kept going from one thing to the other still unsatisfied. To make it worse I have some new Tim Holtz stamps, and really wanted to play with them.  To make this redundant story short I finally gave up and got my new stamps out and started to play. This is what I came up with.


This card has a lot of meaning for me. When I am crafting, or doing other tasks in life, I get excited to start something and then when I do start, I get in a such a hurry to get done I miss the joy in what I am doing. Tonight I finally let go and took my time. I played with my new stamps, my new crackle paint and made a huge mess and enjoyed every minute! It wasn't until the card was almost done that I looked at it and saw a message to myself. It didn't take long to find the right stamp for the sentiment, "Enjoy the Journey" I am going to start making an effort to enjoy a lot more journey's! Here's a few more pictures.


The picture above is a close up of the clock. I don't have any clock hands so I used a spinner and pointed it to the time I finished the card. The picture below shows a close up of the wings to show how they are stamped on vellum and attatched to the card in order to show the patterned paper through them.


I first used 65 pound cardstock for the cards base and attatched a piece of patterned paper. I then painted a piece of heart shaped grungeboard with Distress Crackle Paint in Fired Brick by Ranger. After placing it aside to dry, I stamped the image of the clock from The Journey Stamp Set and the image of the wings from the Regal Flourish Stamp Set, both by Tim Holtz, on a piece of transparency with Black Staz On Ink. I cut the wings in half and attatched them to the card. When the heart started to crackle I sped up the process with a heating tool. I then attatched the image of the clock to the heart with a spinner and fastener from the Game Spinner Set by Tim Holtz. To finish off the card I stamped "Enjoy the Journey" from The Journey Stamp Set directly to the bottom of the card.

There is something very powerful about creating a piece of art whether it be a card, a scrapbook page or any other type of craft, when it has meaning. If you have never had the opportunity to experience this, or maybe just not in a long time. My wish is that you do.

Your comments are important to me. I would love to hear from you about this post. Unitl next time... Take Care & Enjoy Your Journey!

Wednesday, July 14, 2010

You Rock!

Have I ever told you that I love black & white? I do! And by the projects I have been doing lately black has been a very predominent color. Today black & white have been the only colors I have worked with! I've decided to put myself on restriction from making strictly black and white papercrafts for awhile. Well, other than Halloween and this one card I have designed for Christmas. I am even going to put a 30 day time limit on it. So, for the next 30 days I can not make any crafts with a black and white color scheme! I want to take it back already... but I am not going to. I need to get "unstuck" so to speak. I do want you to know that I've made 2 other cards today using the black and white color scheme, so if you see them in my Etsy Shop, I don't want you to think I cheated. 

So here's one of  the projects I made today, which will be one of my last black and white projects for the next 30 days. Believe it or not this is going to be a challenge.


So, what do you think? I think It Rocks! Made me want to go back and be a teenager again, so I can get cool stuff like this and no one will think that I am going through some kind of mid life crisis. My Etsy Shop, Scrapping With Sherry, certainly did not need anything else with black in it, but it does need something for the younger crowd. Let's face it, it needs alot of stuff. Anyway, here's a few more shots.


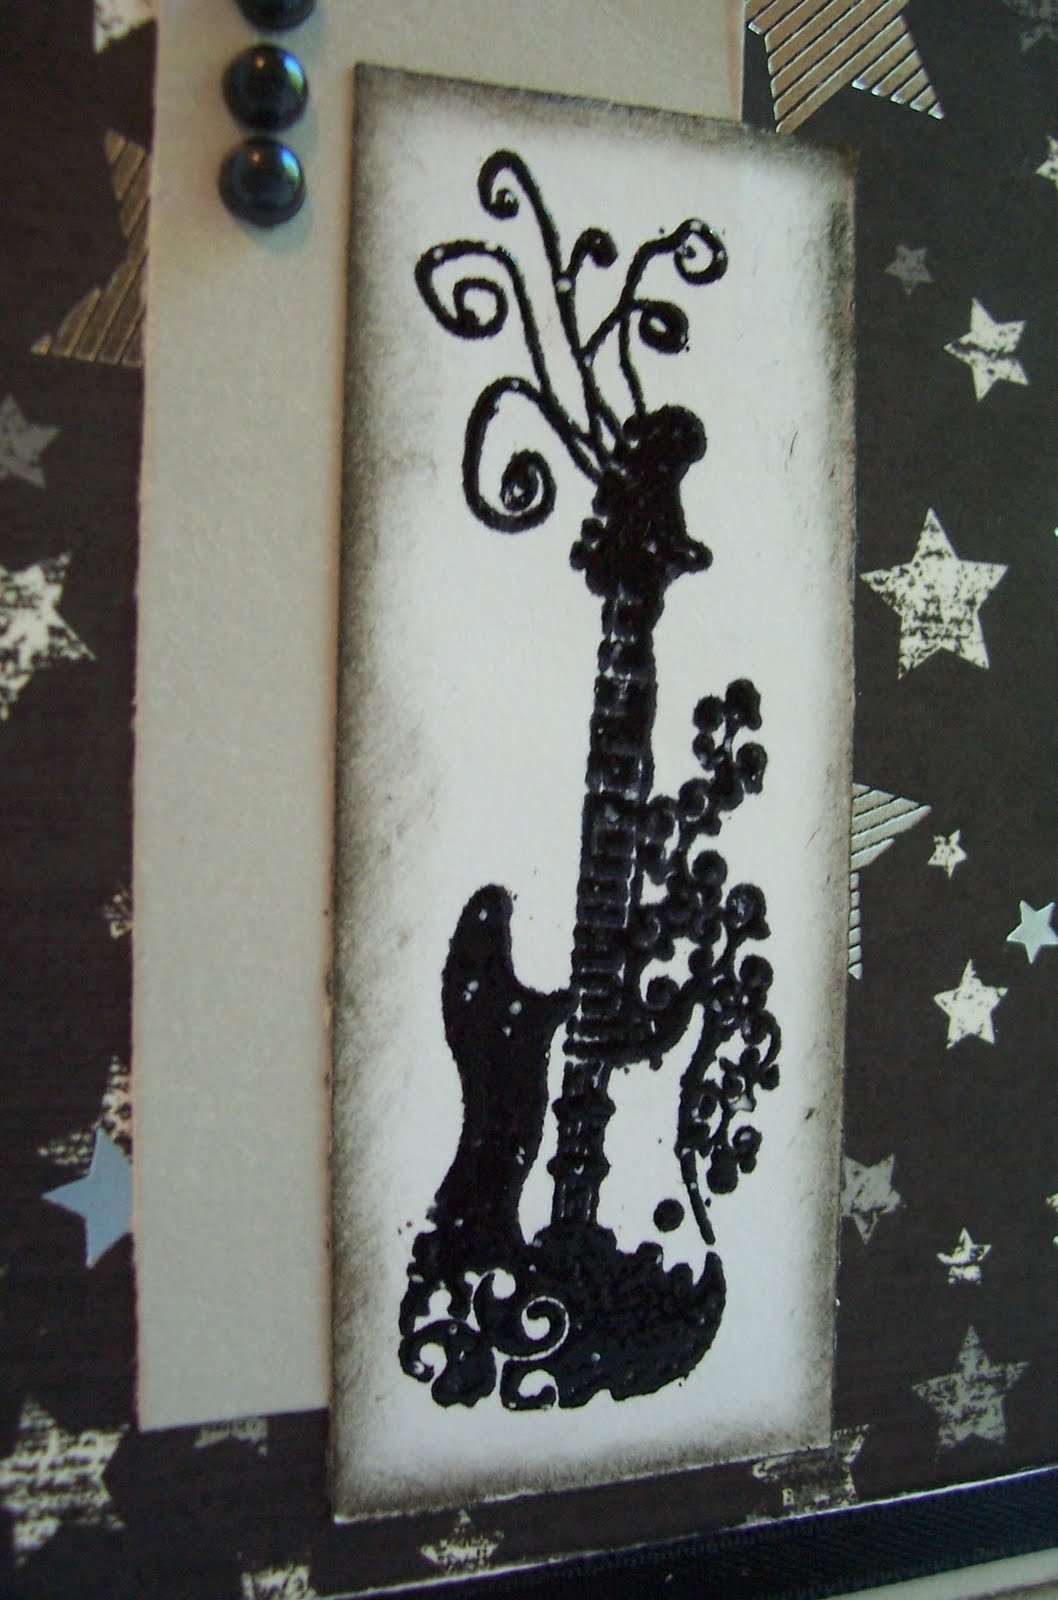
I left the inside blank except for hand stamping the guitar image and embossing it with black embossing powder. I like to make cards with an all occasion theme so that they can be used for a number of different celebrations or just to tell someone "You Rock!".


Above is a closeup of the guitar image that has been handstamped and embossed with black embossing powder. Then I added blank ink around the edges with a blending tool to distress the sides for some texture. I had originally cut out the silver metallic paper to use as a matting for the guitar image. However, I layed it down, went off to do something else and when I came back to it it was askew and off to the side. Well, I thought I kinda like that and that's how it ended up being placed on the card.

Now for the specifics. As always I used 65 pound cardstock to start, for my card base. The background pattern paper is from The Rockstar Stack by DCWV. The metallic paper is from the Nocturne Cardstock Pearlescent Pad by Colorbok. The guitar and "You Rock" sentiment are both stamps by Inkadinkado. (I love that word.) I used Distress Embossing Ink by Tim Holtz for stamping and the black embossing powder was by Al a Mode. I am not sure who the maker is of the little black pearl accents. Oh, I can't forget the ribbon. Very few of my cards are made without it. The ribbon is 1/4 inch black ribbon by Offray.  

If you like this card, watch my Etsy Shop, Scrapping With Sherry, for a Mini Album I am making with the coordinating pattern paper. It would make a great gift to accompany this card! 

Thanks so much for stopping by and please leave me a comment and let me know what you think. Until next time... Take Care!

Sunday, July 11, 2010

Embossed Butterfly Card

I started out the day planning to share my amazing pictures that I took on my camping trip, to find that they weren't so amazing. I would like to blame it all on the camera but truth is I need to learn how to use my camera! I will have another chance this weekend cause my other half, Glenn, has decided that since we had so much fun we are going to do it again. So, maybe I will come back with those amazing pictures for you and get a chance to share more than just my crafts with everyone.

Fortunately today I have been on a creative high! I love these kind of days. If you are a crafter, I know you can relate with what I am talking about. Lately I have been stuck using a lot of black and white. Don't get me wrong they are my favorite colors to work with whether it be photos or my papercraft projects, but today I went with another favorite of mine, pink and brown. I really love the look and plan to put it in my Etsy Shop,  http://www.etsy.com/shop/ScrappingWithSherry , so I am hoping that it goes over well. Actually, you tell me. Here are some photos below.

Embossed Butterfly Card 


Below is a closeup view of the embossed butterfly. I placed the butterfly into one of my Cuttlebug embossing folders and ran it through my Cuttlebug to achieve the look of the raised dots. I do not even remember what crafting was like before I got my Cuttlebug!


I always use 65 pnd cardstock for the base of my cards and recommend this to anyone who makes handmade cards. It really adds to the overall quality. The card measures 4 1/4 x 5 1/2 in size, or A2 for those of you that may be using a template. My goal is to use less store bought embellishments on my handmade cards and just be more creative. The materials I used for this card include, the pattern paper, which is from the Tim Holtz, Vintage Shabby Paper Stack. I stamped the flourishes on the white cardstock using a image from the Big Swirls Collection by Autumn Leaves. I used two different colors to stamp with, Spun Sugar, a Distress Ink by Tim Holtz and  Pixie Dust by VersaMagic. The brown flourishes, butterfly and the sentiment "explore" are all images from the Home Decor, Cricut Cartridge. The ribbon is made by Celebrate It and the Crystal Stickers are by Mark Richards. 

Your comments are important to me. I am eager to get some feedback about my crafts and my blog site. If you have any questions or would like me to contact you please leave an email address. Whether you are here to see what I am up to or to simply get some inspiration I hope you enjoyed todays post as much as I enjoyed doing it. Until next time... Take Care!


Wednesday, July 7, 2010

Black & White Monogram Card

First of all Thank You for visiting my blog. I am new to the blog world, but I have secretly wanted to do this for a long time. I look forward to the journey that I am going to be taking and the friends I am going to make along the way. I have been working on getting my Etsy Store and this blog going for a few weeks now, maybe more... What is the date? With the encouragement and tremendous help of a dear friend I met at PBS Swappers, my papercraft swap group, I am finally almost there! Thank You Kim, I could not have done this without you!!! For my first post I am going to be putting a few pictures up of the first card that I made for my Etsy Store. Alot of firsts going on there...

One picture is never enough. You need a few to really get the full effect of any handmade crafts. Besides, you know how us scrapbookers love our photos!


This second photo, above, shows an up close view of the ruffle I made for this card. It is actually cardstock that has been stamped, embossed and then I put it through a paper crimper to get this effect.

Thanks again for stopping by and sharing my first blog post! Your comments mean alot to me. I would love to hear what you think of my Black & White Monogram Card and anything else you would like to share. Take care and I will see you in a few days when I get back from my camping trip. Hopefully it goes better than last weekend, (it rained the whole time) so I can have some pictures to share with you. Until next time... Take Care!
Related Posts with Thumbnails
PitaPata Dog tickers